Git、便利ですよね。 私は個人のGithubアカウントと、業務用のGithubアカウント、あとBitbucketのアカウントを持ってます。 複数のGitアカウントのssh keyをMacで設定するときの作業メモです。
ssh公開鍵認証
GithubもBitbucketもssh公開鍵認証をサポートしているので、この設定を行うとパスワードを入力せずにgitアクセスすることができます。
秘密鍵ファイルと公開鍵ファイルを自分のMacで作成し、秘密鍵ファイルをそのまま自分のMacのなかに保存し、公開鍵ファイルをGitHubやBitBucketのサーバーにおくことで、ユーザー認証を行います。
ただ、複数のGitHubアカウントを持っていたりすると、鍵の切り替えが面倒だったりするんですよね。 ここでは、GitHubに「toyship」と「toywork」、そして、BitBucketに「toyship」というアカウントをもっていた場合の手順を説明します。 自分のアカウントによみかえてくださいね。
SSH Keyの作成
はじめに、秘密鍵ファイルと公開鍵ファイルの作成から。
ターミナルをひらいて、ホームディレクトリの「.ssh」に移動します。
$ cd .ssh
まず「ssh-keygen」を使ってGitHubの「toyship」アカウントの秘密鍵ファイルと公開鍵ファイルの作成。 途中で「Enter file in which to save the key 」とファイル名を聞かれるので、「./github_toyship_rsa」と入力してください。 「Enter passphrase (empty for no passphrase): 」と「Enter same passphrase again:」では、パスフレーズの設定を聞かれますが、今回は何も入力しないでエンターキーをおしてください。
$ ssh-keygen
Generating public/private rsa key pair.
Enter file in which to save the key (/Users/toyship/.ssh/id_rsa): ./github_toyship_rsa
Enter passphrase (empty for no passphrase):
Enter same passphrase again:
Your identification has been saved in ./github_toyship_rsa.
Your public key has been saved in ./github_toyship_rsa.pub.
The key fingerprint is:
ab:cd:ef:gh:ij:kl:mn:op:qr:st:uv:wx:yz:12:34:56 toyship@mymac.local
The key's randomart image is:
+--[ RSA 2048]----+
| o..o . |
| .... o o |
| o..o . |
| .... o o |
| o..o . |
| .o o |
| o..o . |
| o..o . |
+-----------------+
これで、「github_toyship_rsa」と「github_toyship_rsa.pub」の二つのファイルができました。
次に、GitHubの「toywork」アカウントの秘密鍵ファイルと公開鍵ファイルの作成。 ファイル名を聞かれたら、「./github_toywork_rsa」と入力してください。
$ ssh-keygen
Generating public/private rsa key pair.
Enter file in which to save the key (/Users/toyship/.ssh/id_rsa): ./github_toywork_rsa
Enter passphrase (empty for no passphrase):
Enter same passphrase again:
Your identification has been saved in ./github_toywork_rsa.
Your public key has been saved in ./github_toywork_rsa.pub.
The key fingerprint is:
ab:cd:ef:gh:ij:kl:mn:op:qr:st:uv:wx:yz:12:34:56 toyship@mymac.local
The key's randomart image is:
+--[ RSA 2048]----+
| o..o . |
| .... o o |
| o..o . |
| .... o o |
| o..o . |
| .o o |
| o..o . |
| o..o . |
+-----------------+
これで、「github_toywork_rsa」と「github_toywork_rsa.pub」の二つのファイルができました。 この「github_toywork_rsa」が秘密鍵ファイル、「github_toywork_rsa.pub」が公開鍵ファイルです。
同様に、BitBucketの「toyship」アカウントの秘密鍵ファイルと公開鍵ファイルの作成。 ファイル名を聞かれたら、「./bitbucket_rsa」と入力してください。
$ ssh-keygen
Generating public/private rsa key pair.
Enter file in which to save the key (/Users/toyship/.ssh/id_rsa): ./bitbucket_rsa
Enter passphrase (empty for no passphrase):
Enter same passphrase again:
Your identification has been saved in ./bitbucket_rsa.
Your public key has been saved in ./bitbucket_rsa.pub.
The key fingerprint is:
ab:cd:ef:gh:ij:kl:mn:op:qr:st:uv:wx:yz:12:34:56 toyship@mymac.local
The key's randomart image is:
+--[ RSA 2048]----+
| o..o . |
| .... o o |
| o..o . |
| .... o o |
| o..o . |
| .o o |
| o..o . |
| o..o . |
+-----------------+
これで、「github_bitbucket_rsa」と「github_bitbucket_rsa.pub」の二つのファイルができました。
Configファイルの作成
さて、次はどのサーバーに接続するときにどのssh keyファイルを使うかを設定します。 同じ「.ssh」フォルダーの中に、この内容で「config」というファイルを作成してください。
ここでは、githubという接続先には「github_toyship_rsa」の鍵ファイル、githubwork という接続先には「github_toywork_rsa」の鍵ファイル、bitbucket.orgという接続先には「bitbucket_rsa」の鍵ファイルを使うように設定しています。
Host github
HostName github.com
IdentityFile ~/.ssh/github_toyship_rsa
User git
Host githubwork
HostName github.com
IdentityFile ~/.ssh/github_toywork_rsa
User git
Host bitbucket.org
HostName bitbucket.org
IdentityFile ~/.ssh/bitbucket_rsa
User git
公開鍵ファイル登録
次に、作成した公開鍵ファイルをサーバーに設定しましょう。 まず、下記のコマンドで、「github_toyship_rsa.pub」ファイルの中身をクリップボードにコピーします。
$ cat github_toyship_rsa.pub | pbcopy
それからGitHubサイトにtoyship名義でログインし、設定ページへ。
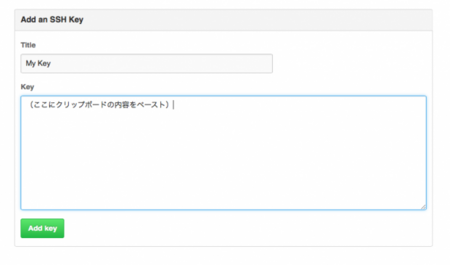
そこtの「SSH Key」画面で「Add SSH Key」ボタンを押して、でてきた画面にキーをペーストします。

同様に、GitHubサイトにtoywork名義でログインし、「./github_toywork_rsa.pub」の内容を登録。 BitBucketサイトでも「./bitbucket_rsa.pub」の内容を登録してください。
接続確認
ここまでで設定は完了しているはずなので、接続確認をしてみましょう。
ssh にTオプションをつけると、接続確認をすることができます。 githubの接続確認をすると「github_toyship_rsa」の鍵ファイルが使われ、設定がうまくいっていれば「You've successfully authenticated」というメッセージが表示されます。
$ ssh -T github
Hi toyship! You've successfully authenticated, but GitHub does not provide shell access.
githubworkの接続確認をすると「github_toywork_rsa」の鍵ファイルが使われます。
$ ssh -T githubwork
Hi toywork! You've successfully authenticated, but GitHub does not provide shell access.
同様に、bitbucketの接続確認をすると、「bitbucket_rsa」の鍵ファイルが使われます。
$ ssh -T bitbucket
logged in as toyship.
接続確認がうまくいかなかったら、もう一度設定を見直してみてください。
実際にgitにsshする
接続確認がうまくいったら、sshをつかってgitにアクセスしてみましょう。
GitHubの「toyship」アカウントでアクセスするときにはこちら。
git clone git@githubwork:mycompany/MyProject.git
GitHubの「toywork」アカウントアクセスするときにはこちら。 (configで設定したgithubworkを使います。)
git clone git@github:mycompany/MyProject.git
Bitbucketの「toyship」アカウントでアクセスするときにはこちら。
git clone git@bitbucket.org:toyship/MyProject.git