これはWatchKit Advent Calendar 2014の19日目の記事です。
WatchKitではいろいろなUIコントロールが表示できますが、ここではTableを表示してみましょう。
テーブル用クラスの作成
WatchKitでテーブルを表示する場合は、UITableViewではなくWKInterfaceTableというクラスを使います。
まずは、画面のViewControllerのクラスを作成します。 WatchKitなので、WKInterfaceControllerを使います。
WKInterfaceControllerを継承したFruitListInterfaceControllerというクラスを作ってみます。 そして、その propertyとしてWKInterfaceTableを追加しておきます。
#import <WatchKit/WatchKit.h>
#import <Foundation/Foundation.h>

@interface FruitListInterfaceController : WKInterfaceController

@property (weak, nonatomic) IBOutlet WKInterfaceTable *fruittable;
@end
また、行に表示するセル用のクラスとして、NSObjectを継承したクラスをつくっておきます。 そして、セルのなかに表示する要素として、文字を表示するWKInterfaceLabelと画像表示用のWKInterfaceImageを追加しておきます。
#import <Foundation/Foundation.h>
#import <WatchKit/WatchKit.h>

@interface MyFruit : NSObject

@property (weak, nonatomic) IBOutlet WKInterfaceLabel* fruitname;
@property (weak, nonatomic) IBOutlet WKInterfaceImage* fruiticon;

@end
Storyboardの設定と接続
次に、Storyboardの設定をしましょう。
Tableを表示するためのWKInterfaceControllerを設定します。 Storyboardに新しいWKInterfaceControllerを追加してもいいですし、既存のWKInterfaceControllerを使っても大丈夫です。
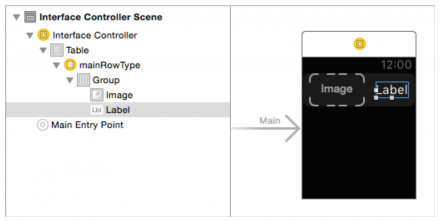
Storyboard上のそのWKInterfaceControllerの上に、「Table」オブジェクト(WKInterfaceTable)を配置します。 また、そのTableのなかに、「Label」オブジェクト(WKInterfaceLabel)と「Image」オブジェクト(WKInterfaceImage)を一つづつ配置します。
次に、そのWKInterfaceControllerのオブジェクトのカスタムクラスをさきほど設定したWKInterfaceController継承クラスとします。(上のコード例ではFruitListInterfaceController)
また、そのStoryboard上のそのWKInterfaceControllerのオブジェクト上のWKInterfaceTableと、クラスのWKInterfaceTable propertyを接続します。
さらに、行要素のカスタムクラス(下の画面でmainRowTypeと表示されている部分です)に、さきほど作成したNSObjectの継承クラス(上のコード例ではMyFruit)を設定します。
さらに、「Label」オブジェクト(WKInterfaceLabel)と「Image」オブジェクト(WKInterfaceImage)をMyFruitのpropertyと接続します。
(文章だけで説明するとわかりにくくて申し訳ないのですが、Xcodeの画面は現時点ではまだNDAなので……)
行の生成
そして、 FruitListInterfaceControllerの実装ファイルに、下記のloadTableDataメソッドを追加します。 setNumberOfRowsを使用して、行の要素をここで設定します。
これでテーブルの行が表示されるようになりました。
#import "FruitListInterfaceController.h"
#import "MyFruit.h"

@interface FruitListInterfaceController()

- (void)loadTableData;

@property (strong, nonatomic) NSArray *fruitNames;

@end

@implementation FruitListInterfaceController

- (void)awakeWithContext:(id)context {
    [super awakeWithContext:context];
}

- (void)willActivate {

    [super willActivate];

    [self loadTableData];

}

- (void)didDeactivate {

    [super didDeactivate];
}

- (void)loadTableData {

    self.fruitNames = @[@"Apple", @"Orange", @"Banana"];
    NSArray* fruitsimages = @[@"apple.png",@"orange.png",@"banana.png"];

    [self.fruittable setNumberOfRows:self.fruitNames.count withRowType:@"default"];

    [self.fruitNames enumerateObjectsUsingBlock:^(NSString *name, NSUInteger idx, BOOL *stop) {

        MyFruit *row = [self.fruittable rowControllerAtIndex:idx];

        [row.fruitname setText:name];
        [row.fruiticon setImageNamed:[fruitsimages objectAtIndex:idx]];

    }];
}

@end
行選択時の処理
テーブルの行選択時の処理には、didSelectRowAtIndexを実装します。
- (void)table:(WKInterfaceTable *)table didSelectRowAtIndex:(NSInteger)rowIndex {

    NSLog(@"pressed...");

}
WatchKitでのテーブルの設定はiOSよりは単純です。 実機でどの程度のパフォーマンスがでるのかが気になるところです。
